开发环境与部署环境相同
OS: Ubuntu 16.04 LTS (默认Python2.7.11)
Python: 3.5.1
Django: 1.9.6
Git:
Bootstrap: 3.3.5
virtualenv: 15.0.1 (ubuntu 16.04 自带Python 2.7 ,基于Python 2 安装virtualenv, 在virtual env 内安装 python 3.5.1)
环境下载地址:
Ubuntu 16.04 LTS : http://www.ubuntu.org.cn/download/desktop/contribute/?version=16.04&architecture=amd64
Python 3.5.1: https://www.python.org/downloads/ (Ubuntu 默认的Python3就是Python3.5.1)
Bootstrap 3.3.5: http://v3.bootcss.com/getting-started#download
--------
安装virtualenv,使用它搭建一个Python3.5.1 的开发环境。
环境内安装Django、Bootstrap等需要使用的软件
更新Ubuntu的源
增加国内的源
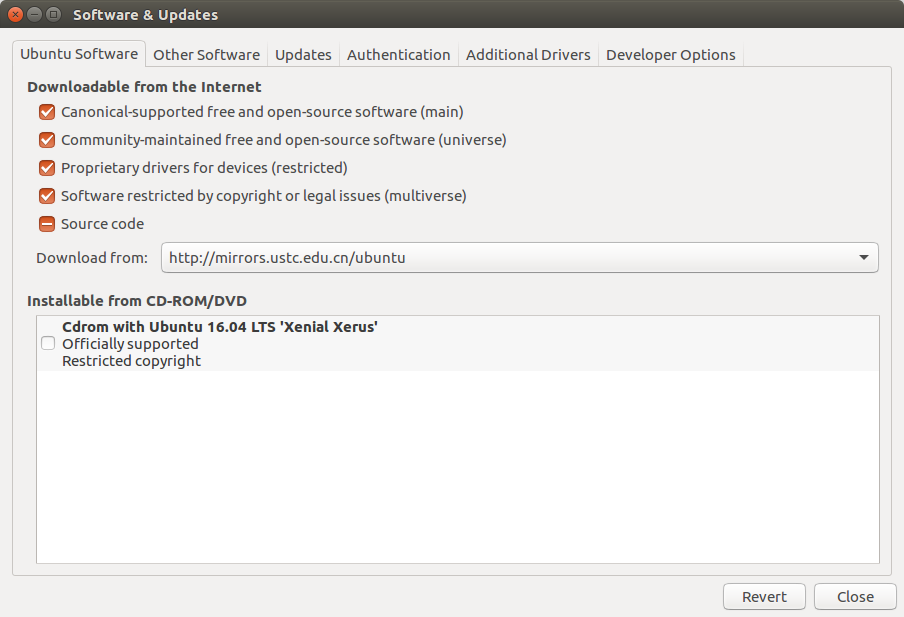
system settings --> Software & Updates --> source ocde --> others, click the "select best server" button --> reload
refer to :
Install Sogou Input Method(搜狗输入法)
增加国内的源
1. download sougou from : http://pinyin.sogou.com/linux/ sogoupinyin_2.0.0.0072_amd64.deb
2. double click on the deb packages to install it
3. Enable it: system settings --> language support --> Cfix --> close
4. restarte the OS
第一步安装pip
lxl@ubuntu:~$ pipThe program 'pip' is currently not installed. You can install it by typing:sudo apt install python-piplxl@ubuntu:~$ lxl@ubuntu:~$ lxl@ubuntu:~$ sudo apt install python-pip[sudo] password for lxl: Reading package lists... DoneBuilding dependency tree Reading state information... DoneThe following additional packages will be installed: libexpat1-dev libpython-all-dev libpython-dev libpython2.7-dev python-all python-all-dev python-dev python-pip-whl python-pkg-resources python-setuptools python-wheel python2.7-devSuggested packages: python-setuptools-docThe following NEW packages will be installed: libexpat1-dev libpython-all-dev libpython-dev libpython2.7-dev python-all python-all-dev python-dev python-pip python-pip-whl python-pkg-resources python-setuptools python-wheel python2.7-dev0 upgraded, 13 newly installed, 0 to remove and 0 not upgraded.Need to get 29.7 MB of archives.After this operation, 45.1 MB of additional disk space will be used.Do you want to continue? [Y/n] YGet:1 http://us.archive.ubuntu.com/ubuntu xenial/main amd64 libexpat1-dev amd64 2.1.0-7 [115 kB]Get:2 http://us.archive.ubuntu.com/ubuntu xenial/main amd64 libpython2.7-dev amd64 2.7.11-7ubuntu1 [27.8 MB]Get:3 http://us.archive.ubuntu.com/ubuntu xenial/main amd64 libpython-dev amd64 2.7.11-1 [7,728 B] Get:4 http://us.archive.ubuntu.com/ubuntu xenial/main amd64 libpython-all-dev amd64 2.7.11-1 [992 B] Get:5 http://us.archive.ubuntu.com/ubuntu xenial/main amd64 python-all amd64 2.7.11-1 [978 B] Get:6 http://us.archive.ubuntu.com/ubuntu xenial/main amd64 python2.7-dev amd64 2.7.11-7ubuntu1 [280 kB] Get:7 http://us.archive.ubuntu.com/ubuntu xenial/main amd64 python-dev amd64 2.7.11-1 [1,160 B] Get:8 http://us.archive.ubuntu.com/ubuntu xenial/main amd64 python-all-dev amd64 2.7.11-1 [1,000 B] Get:9 http://us.archive.ubuntu.com/ubuntu xenial/universe amd64 python-pip-whl all 8.1.1-2 [1,074 kB] Get:10 http://us.archive.ubuntu.com/ubuntu xenial/universe amd64 python-pip all 8.1.1-2 [144 kB] Get:11 http://us.archive.ubuntu.com/ubuntu xenial/main amd64 python-pkg-resources all 20.7.0-1 [108 kB] Get:12 http://us.archive.ubuntu.com/ubuntu xenial/main amd64 python-setuptools all 20.7.0-1 [169 kB] Get:13 http://us.archive.ubuntu.com/ubuntu xenial/universe amd64 python-wheel all 0.29.0-1 [48.0 kB] Fetched 29.7 MB in 2min 39s (186 kB/s) Selecting previously unselected package libexpat1-dev:amd64.(Reading database ... 172133 files and directories currently installed.)Preparing to unpack .../libexpat1-dev_2.1.0-7_amd64.deb ...Unpacking libexpat1-dev:amd64 (2.1.0-7) ...Selecting previously unselected package libpython2.7-dev:amd64.Preparing to unpack .../libpython2.7-dev_2.7.11-7ubuntu1_amd64.deb ...Unpacking libpython2.7-dev:amd64 (2.7.11-7ubuntu1) ...Selecting previously unselected package libpython-dev:amd64.Preparing to unpack .../libpython-dev_2.7.11-1_amd64.deb ...Unpacking libpython-dev:amd64 (2.7.11-1) ...Selecting previously unselected package libpython-all-dev:amd64.Preparing to unpack .../libpython-all-dev_2.7.11-1_amd64.deb ...Unpacking libpython-all-dev:amd64 (2.7.11-1) ...Selecting previously unselected package python-all.Preparing to unpack .../python-all_2.7.11-1_amd64.deb ...Unpacking python-all (2.7.11-1) ...Selecting previously unselected package python2.7-dev.Preparing to unpack .../python2.7-dev_2.7.11-7ubuntu1_amd64.deb ...Unpacking python2.7-dev (2.7.11-7ubuntu1) ...Selecting previously unselected package python-dev.Preparing to unpack .../python-dev_2.7.11-1_amd64.deb ...Unpacking python-dev (2.7.11-1) ...Selecting previously unselected package python-all-dev.Preparing to unpack .../python-all-dev_2.7.11-1_amd64.deb ...Unpacking python-all-dev (2.7.11-1) ...Selecting previously unselected package python-pip-whl.Preparing to unpack .../python-pip-whl_8.1.1-2_all.deb ...Unpacking python-pip-whl (8.1.1-2) ...Selecting previously unselected package python-pip.Preparing to unpack .../python-pip_8.1.1-2_all.deb ...Unpacking python-pip (8.1.1-2) ...Selecting previously unselected package python-pkg-resources.Preparing to unpack .../python-pkg-resources_20.7.0-1_all.deb ...Unpacking python-pkg-resources (20.7.0-1) ...Selecting previously unselected package python-setuptools.Preparing to unpack .../python-setuptools_20.7.0-1_all.deb ...Unpacking python-setuptools (20.7.0-1) ...Selecting previously unselected package python-wheel.Preparing to unpack .../python-wheel_0.29.0-1_all.deb ...Unpacking python-wheel (0.29.0-1) ...Processing triggers for doc-base (0.10.7) ...Processing 1 added doc-base file...Processing triggers for man-db (2.7.5-1) ...Setting up libexpat1-dev:amd64 (2.1.0-7) ...Setting up libpython2.7-dev:amd64 (2.7.11-7ubuntu1) ...Setting up libpython-dev:amd64 (2.7.11-1) ...Setting up libpython-all-dev:amd64 (2.7.11-1) ...Setting up python-all (2.7.11-1) ...Setting up python2.7-dev (2.7.11-7ubuntu1) ...Setting up python-dev (2.7.11-1) ...Setting up python-all-dev (2.7.11-1) ...Setting up python-pip-whl (8.1.1-2) ...Setting up python-pip (8.1.1-2) ...Setting up python-pkg-resources (20.7.0-1) ...Setting up python-setuptools (20.7.0-1) ...Setting up python-wheel (0.29.0-1) ...lxl@ubuntu:~$ lxl@ubuntu:~$ lxl@ubuntu:~$ pip helpUsage: pip[options]Commands: install Install packages. download Download packages. uninstall Uninstall packages. freeze Output installed packages in requirements format. list List installed packages. show Show information about installed packages. search Search PyPI for packages. wheel Build wheels from your requirements. hash Compute hashes of package archives. completion A helper command used for command completion help Show help for commands.General Options: -h, --help Show help. --isolated Run pip in an isolated mode, ignoring environment variables and user configuration. -v, --verbose Give more output. Option is additive, and can be used up to 3 times. -V, --version Show version and exit. -q, --quiet Give less output. --log Path to a verbose appending log. --proxy Specify a proxy in the form [user:passwd@]proxy.server:port. --retries Maximum number of retries each connection should attempt (default 5 times). --timeout Set the socket timeout (default 15 seconds). --exists-action Default action when a path already exists: (s)witch, (i)gnore, (w)ipe, (b)ackup. --trusted-host Mark this host as trusted, even though it does not have valid or any HTTPS. --cert Path to alternate CA bundle. --client-cert Path to SSL client certificate, a single file containing the private key and the certificate in PEM format. --cache-dir Store the cache data in . --no-cache-dir Disable the cache. --disable-pip-version-check Don't periodically check PyPI to determine whether a new version of pip is available for download. Implied with --no-index.lxl@ubuntu:~$ lxl@ubuntu:~$ pip --versionpip 8.1.1 from /usr/lib/python2.7/dist-packages (python 2.7)lxl@ubuntu:~$
第二步 安装virtualenv
lxl@ubuntu:~$ lxl@ubuntu:~$ virtualenvThe program 'virtualenv' is currently not installed. You can install it by typing:sudo apt install virtualenvlxl@ubuntu:~$ lxl@ubuntu:~$ lxl@ubuntu:~$ sudo pip install virtualenv[sudo] password for lxl: The directory '/home/lxl/.cache/pip/http' or its parent directory is not owned by the current user and the cache has been disabled. Please check the permissions and owner of that directory. If executing pip with sudo, you may want sudo's -H flag.The directory '/home/lxl/.cache/pip' or its parent directory is not owned by the current user and caching wheels has been disabled. check the permissions and owner of that directory. If executing pip with sudo, you may want sudo's -H flag.Collecting virtualenv Downloading virtualenv-15.0.1-py2.py3-none-any.whl (1.8MB) 100% |████████████████████████████████| 1.8MB 227kB/s Installing collected packages: virtualenvSuccessfully installed virtualenv-15.0.1lxl@ubuntu:~$ lxl@ubuntu:~$ virtualenvYou must provide a DEST_DIRUsage: virtualenv [OPTIONS] DEST_DIROptions: --version show program's version number and exit -h, --help show this help message and exit -v, --verbose Increase verbosity. -q, --quiet Decrease verbosity. -p PYTHON_EXE, --python=PYTHON_EXE The Python interpreter to use, e.g., --python=python2.5 will use the python2.5 interpreter to create the new environment. The default is the interpreter that virtualenv was installed with (/usr/bin/python) --clear Clear out the non-root install and start from scratch. --no-site-packages DEPRECATED. Retained only for backward compatibility. Not having access to global site-packages is now the default behavior. --system-site-packages Give the virtual environment access to the global site-packages. --always-copy Always copy files rather than symlinking. --unzip-setuptools Unzip Setuptools when installing it. --relocatable Make an EXISTING virtualenv environment relocatable. This fixes up scripts and makes all .pth files relative. --no-setuptools Do not install setuptools in the new virtualenv. --no-pip Do not install pip in the new virtualenv. --no-wheel Do not install wheel in the new virtualenv. --extra-search-dir=DIR Directory to look for setuptools/pip distributions in. This option can be used multiple times. --download Download preinstalled packages from PyPI. --no-download, --never-download Do not download preinstalled packages from PyPI. --prompt=PROMPT Provides an alternative prompt prefix for this environment. --setuptools DEPRECATED. Retained only for backward compatibility. This option has no effect. --distribute DEPRECATED. Retained only for backward compatibility. This option has no effect.lxl@ubuntu:~$ lxl@ubuntu:~$ lxl@ubuntu:~$ virtualenv --version15.0.1lxl@ubuntu:~$
Refer to:
第三步 使用 virtualenv建立一个开发Py3.5.1 的开发环境,名为MBlog,并在其内部安装Django
lxl@ubuntu:~$ lxl@ubuntu:~$ cd Documents/lxl@ubuntu:~/Documents$ virtualenv --python=python3.5 MBlogRunning virtualenv with interpreter /usr/bin/python3.5Using base prefix '/usr'New python executable in /home/lxl/Documents/MBlog/bin/python3.5Also creating executable in /home/lxl/Documents/MBlog/bin/pythonInstalling setuptools, pip, wheel...done.lxl@ubuntu:~/Documents$ lxl@ubuntu:~/Documents$ lsMBloglxl@ubuntu:~/Documents$ cd MBlog/lxl@ubuntu:~/Documents/MBlog$ lsbin include lib pip-selfcheck.jsonlxl@ubuntu:~/Documents/MBlog$ lxl@ubuntu:~/Documents/MBlog$ source bin/activate(MBlog) lxl@ubuntu:~/Documents/MBlog$ pythonPython 3.5.1+ (default, Mar 30 2016, 22:46:26) [GCC 5.3.1 20160330] on linuxType "help", "copyright", "credits" or "license" for more information.>>> quit()(MBlog) lxl@ubuntu:~/Documents/MBlog$ pip listpip (8.1.1)setuptools (21.0.0)wheel (0.29.0)(MBlog) lxl@ubuntu:~/Documents/MBlog$ (MBlog) lxl@ubuntu:~/Documents/MBlog$ pip install djangoCollecting django Downloading Django-1.9.6-py2.py3-none-any.whl (6.6MB) 100% |████████████████████████████████| 6.6MB 196kB/s Installing collected packages: djangoSuccessfully installed django-1.9.6(MBlog) lxl@ubuntu:~/Documents/MBlog$ pip listDjango (1.9.6)pip (8.1.1)setuptools (21.0.0)wheel (0.29.0)(MBlog) lxl@ubuntu:~/Documents/MBlog$ (MBlog) lxl@ubuntu:~/Documents/MBlog$ deactivate lxl@ubuntu:~/Documents/MBlog$
Refer to : Django 官网
第四步 安装Git, 并把刚建立的MBlog 环境纳入到Git 的管理中
安装Git
lxl@ubuntu:~/Documents$ lxl@ubuntu:~/Documents$ gitThe program 'git' is currently not installed. You can install it by typing:sudo apt install gitlxl@ubuntu:~/Documents$ lxl@ubuntu:~/Documents$ sudo apt install git[sudo] password for lxl: Reading package lists... DoneBuilding dependency tree Reading state information... DoneThe following additional packages will be installed: git-man liberror-perlSuggested packages: git-daemon-run | git-daemon-sysvinit git-doc git-el git-email git-gui gitk gitweb git-arch git-cvs git-mediawiki git-svnThe following NEW packages will be installed: git git-man liberror-perl0 upgraded, 3 newly installed, 0 to remove and 0 not upgraded.Need to get 3,760 kB of archives.After this operation, 25.6 MB of additional disk space will be used.Do you want to continue? [Y/n] YGet:1 http://mirrors.ustc.edu.cn/ubuntu xenial/main amd64 liberror-perl all 0.17-1.2 [19.6 kB]Get:2 http://mirrors.ustc.edu.cn/ubuntu xenial/main amd64 git-man all 1:2.7.4-0ubuntu1 [735 kB]Get:3 http://mirrors.ustc.edu.cn/ubuntu xenial/main amd64 git amd64 1:2.7.4-0ubuntu1 [3,006 kB]Fetched 3,760 kB in 1s (1,936 kB/s)Selecting previously unselected package liberror-perl.(Reading database ... 173305 files and directories currently installed.)Preparing to unpack .../liberror-perl_0.17-1.2_all.deb ...Unpacking liberror-perl (0.17-1.2) ...Selecting previously unselected package git-man.Preparing to unpack .../git-man_1%3a2.7.4-0ubuntu1_all.deb ...Unpacking git-man (1:2.7.4-0ubuntu1) ...Selecting previously unselected package git.Preparing to unpack .../git_1%3a2.7.4-0ubuntu1_amd64.deb ...Unpacking git (1:2.7.4-0ubuntu1) ...Processing triggers for man-db (2.7.5-1) ...Setting up liberror-perl (0.17-1.2) ...Setting up git-man (1:2.7.4-0ubuntu1) ...Setting up git (1:2.7.4-0ubuntu1) ...W: Target Sources (main/source/Sources) is configured multiple times in /etc/apt/sources.list:2 and /etc/apt/sources.list:7lxl@ubuntu:~/Documents$ lxl@ubuntu:~/Documents$ git helpusage: git [--version] [--help] [-C] [-c name=value] [--exec-path[= ]] [--html-path] [--man-path] [--info-path] [-p | --paginate | --no-pager] [--no-replace-objects] [--bare] [--git-dir= ] [--work-tree= ] [--namespace= ] [ ]These are common Git commands used in various situations:start a working area (see also: git help tutorial) clone Clone a repository into a new directory init Create an empty Git repository or reinitialize an existing onework on the current change (see also: git help everyday) add Add file contents to the index mv Move or rename a file, a directory, or a symlink reset Reset current HEAD to the specified state rm Remove files from the working tree and from the indexexamine the history and state (see also: git help revisions) bisect Use binary search to find the commit that introduced a bug grep Print lines matching a pattern log Show commit logs show Show various types of objects status Show the working tree statusgrow, mark and tweak your common history branch List, create, or delete branches checkout Switch branches or restore working tree files commit Record changes to the repository diff Show changes between commits, commit and working tree, etc merge Join two or more development histories together rebase Forward-port local commits to the updated upstream head tag Create, list, delete or verify a tag object signed with GPGcollaborate (see also: git help workflows) fetch Download objects and refs from another repository pull Fetch from and integrate with another repository or a local branch push Update remote refs along with associated objects'git help -a' and 'git help -g' list available subcommands and someconcept guides. See 'git help ' or 'git help 'to read about a specific subcommand or concept.lxl@ubuntu:~/Documents$ lxl@ubuntu:~/Documents$ git --versiongit version 2.7.4lxl@ubuntu:~/Documents$
配置Git & 测试Git仓库的提交
添加SSH证书,使用Shell可以提交修改内容
安装完成后,还需要最后一步设置,在命令行输入:
$ git config --global user.name "Your Name"$ git config --global user.email "email@example.com"然后我们需要配置SSH。第1步:创建SSH Key。在用户主目录下,看看有没有.ssh目录,如果有,再看看这个目录下有没有id_rsa和id_rsa.pub这两个文件,如果已经有了,可直接跳到下一步。如果没有,打开Shell(Windows下打开Git Bash),创建SSH Key:$ ssh-keygen -t rsa -C "youremail@example.com"你需要把邮件地址换成你自己的邮件地址,然后一路回车,使用默认值即可,由于这个Key也不是用于军事目的,所以也无需设置密码。如果一切顺利的话,可以在用户主目录里找到.ssh目录,里面有id_rsa和id_rsa.pub两个文件,这两个就是SSH Key的秘钥对,id_rsa是私钥,不能泄露出去,id_rsa.pub是公钥,可以放心地告诉任何人。第2步:登陆GitHub,打开“settings” --> “SSH and GPG Keys”页面,点击"New SSH Key” 输入Title为"Linux-ssh-rsa-Ubuntu公用机器",并把 公有钥匙(id_rsa.pub中的内容) 拷贝进来,点击“Add ssh key”保存设置。最后结果如下图:
------- 操作过程如下 --------
lxl@ubuntu:~/Documents$ git config --global user.name "lxl0245"lxl@ubuntu:~/Documents$ git config --global user.email "lixinli.bj@163.com"lxl@ubuntu:~$ git config -luser.name=lxl0245user.email=lixinli.bj@163.comlxl@ubuntu:~$ lxl@ubuntu:~$ ssh-keygen -t rsa -C "lixinli.bj@163.com"Generating public/private rsa key pair.Enter file in which to save the key (/home/lxl/.ssh/id_rsa): Created directory '/home/lxl/.ssh'.Enter passphrase (empty for no passphrase): Enter same passphrase again: Your identification has been saved in /home/lxl/.ssh/id_rsa.Your public key has been saved in /home/lxl/.ssh/id_rsa.pub.The key fingerprint is:SHA256:B6DxShqGcFNJCwV4QHp1Wcrgl/RDSFpYKNQ+O0FwfZk lixinli.bj@163.comThe key's randomart image is:+---[RSA 2048]----+|+=BBOBB+oo ||+oo**%+*E ||o.++* *.+ || o ++o o || . .+ S . || o . || . || || |+----[SHA256]-----+lxl@ubuntu:~$ lxl@ubuntu:~$ lltotal 136drwxr-xr-x 19 lxl lxl 4096 May 6 14:58 ./drwxr-xr-x 3 root root 4096 May 5 22:04 ../-rw------- 1 lxl lxl 123 May 5 23:13 .bash_history……………………………………………………………………………………………………………………………………………………-rw------- 1 lxl lxl 14 May 5 23:44 .python_historydrwx------ 2 lxl lxl 4096 May 6 14:58 .ssh/-rw-r--r-- 1 lxl lxl 0 May 5 22:20 .sudo_as_admin_successful……………………………………………………………………………………………………………………………………………………-rw------- 1 lxl lxl 1376 May 5 23:18 .xsession-errors.oldlxl@ubuntu:~$ ll .ssh/total 16drwx------ 2 lxl lxl 4096 May 6 14:58 ./drwxr-xr-x 19 lxl lxl 4096 May 6 14:58 ../-rw------- 1 lxl lxl 1679 May 6 14:58 id_rsa-rw-r--r-- 1 lxl lxl 400 May 6 14:58 id_rsa.publxl@ubuntu:~$ cat .ssh/id_rsa-----BEGIN RSA PRIVATE KEY-----MIIEpgIBAAKCAQEA5Y9UqBi6VqwzGXmq19d/vTPdRxuUCy1VssxilJQ6MhlcenKO5yRrRjnmHME0d6Q6v9Au8hc70qC+5dYGL/YiN6SEUSraAddMm+at2x4R2rZKBK/v2b167fkn2KhLF7E4N3fRxhrG3GubHr1bgWocVfNbWx6ba3OBU7dnnWI3lzWv5azsuOpD8YEIcF+M/UtPuBcp6/cTAfLxjoml62+RhCRQoDjDhQsfoPfsFriA134In7ol6CDoxz3icSrfziw0b91CVlRMT8dZUlO/Cvq/Wus2jc6mI7RcfRbqJHdsrV3fphRdH9+spOwEWZUGkhQnwYeYN3cWkPf0qD925Az9dwIDAQABAoIBAQCC14EfFokO4bN2b7yKrc+nHaqf3v4wqLRR5uDBYwMQjxgAys7cvAtQyat49D5dewPpVFWNsuRsFyb3hVedeqLiKCkqwkvkBL0rlv29CJSQnpnttgH1j2RDw2GMwc+bP22VX/v2+EgkVkjh6nf/eWWRL9YAR5+6TOmHt9+c+uBIlELDd77IGLVcG/cDdyaq5J+xtrDhFX9rHHYoWDlwOZWJO4vOQUBpkNrva8/06vzCfdvM+lgP6zvECP+D/qfmeTYcXk9YXwX+DP7h1e58FvV1B2ISohM6oxHBQE/xRBowBPGGOHscYPd+ZxC6FnwbIqEoNEjK48rU58aYzTR25thRAoGBAPTAl2b5uSR/OwD7gnRb/iGcO0VFQv9wO1k06gtYRQRAkwv2dPKfE3MNxnk9XjWhD4mEzm9yIc2YrNY6TsyQBfVEz4j89YbRV3cXPUAOiHQx6Msk7v4RqYpKwR8jrFudkOa+KkmehpipOBC1ctsvlrbI7JHaYRxYUT8JLlmsO6xVAoGBAPAcuOpD8YEIcF+M/UtPuBcp6/cTAfLxjoml62+RhCRQoDjDhQsfoPfsFriA134In7olfTdGUNPiebjUY7sn4dGkDa9TKJYdvkQTxYA/OrPMFgM5laQsQtnz0YPhxlBtTM3YXvUxoRgLcra8AJKx2MRbYT6KETWbjfjnUPOFgw6bAoGBAMdUKnoFG1GsBOPR8fbODPRWhrbtp5jdUJhgTdQbeWnzJU7y01/dSjvDlkabQiSvHTZEYNPGwdztYKXAKvjSuud7uQG58kRwLamh1ZJbw6nOE+eOFs34mHk2VH4F0ZNzidVCPrJiVv/xoOWKwRXddgM7M9+9WKV7EAAkfAkwChFZAoGBAIaa7M0bvv2Xjbud0pApLWXL+hCWfMbxQ36UHc5r21jsT7pB9cobZWqBdZHaWbt2Dz5KR0wpez6NhDd9ubs+DHZ+Rb24HNSrL/LyWDlwOZWJO4vOQUBpkNrva8/06vzCfdvM+lgP6zvECP+D/qfmeTYcXk9YXwX+DP7hRdJ/Uo1pAoGBAOvWxXSjXfy6Ma7MhoI6bawDgntdiKMrUOhYI0PWkIunV1w3DiEjdCwflOOS6RwiJ6gMRLaAni4TDg4+G7dH+xxCJqr9eoXw4Qv+JRJNOvcawoVXxw8WzI3dZ5nBUoAt0KD+azHtkcFWCUdyEm1DJnwQqObAD0qozTYo8kvAk5zl-----END RSA PRIVATE KEY-----lxl@ubuntu:~$ lxl@ubuntu:~$ cat .ssh/id_rsa.pub ssh-rsa AAAAB3Nzrc4FTt2edYjeXNa/aC1ycLVWyzGKUlDoyGVx6co7nJGtGOeYcwTR3pGLpWrDMZearX13+9M91HG5QL/0C7yFzvSoL7l1gYv9iI3pIRRKtoB10yb5q3bHhHatkoEr+/ZvXrt+SfYqEsXsTg3d9HGGsbca5sevVMB8vGOiaXrb5GEJFCgOMOFCx+g9+wWuIDXfgifuiXoIOjHuBahxV81tbHptlrOy46kPxgQhwX4v3UJWVDq2EAAAADAQABAAABAQDlj1SoExPx1lSU78K+r9a6zaNzqYjtFx9Fuokz9S0+4Fynr9xPeJxKt/OLDRd2ytXd+mFF0f36yk7ARZlQaSFCfBh5g3dxaQ9/SoP3bkDP13 lixinli.bj@163.comlxl@ubuntu:~$ lxl@ubuntu:~$ 登陆 Github, Settings--> SSH and GPG Keys --> Add SSH Keys --> Add 添加成功。登陆 Github 建立新的仓库,此处命名为 git-repo-test ,在SHELL中进入到Git 仓库目录下,执行: -- git remote add origin git@github.com:lxl0245/git-repo-test.git -- git push -u origin master l@ubuntu:~/Documents/git-repo-test$ git remote add origin git@github.com:lxl0245/git-repo-test.git l@ubuntu:~/Documents/git-repo-test$ git push -u origin master Warning: Permanently added the RSA host key for IP address '192.30.252.129' to the list of known hosts. Counting objects: 3, done. Writing objects: 100% (3/3), 332 bytes | 0 bytes/s, done. Total 3 (delta 0), reused 0 (delta 0) To git@github.com:l0245/git-repo-test.git * [new branch] master -> master Branch master set up to track remote branch master from origin. l@ubuntu:~/Documents/git-repo-test$
Refer to : https://segmentfault.com/a/1190000002645623 ,其中第6步修改config中的url可以跳过